I recently bought one of the new Raspberry Pi Zero W boards to build a wireless CCTV camera. This article shows how to get the Raspbian Operating System installed and connected to your local WLAN network.
1. The Shopping List
What I bought was the following:
- A Raspberry Pi Zero W Kit with a plastic case and the camera adapter cable (approx. 20 EUR)
- A PiNoIR v2 camera module (approx. 30 EUR)
- An 8 GB SanDisk MicroSDHC class 10 memory card (approx. 7 EUR)
As for the power supply, you can take any 5V charger from an Android phone with a micro USB connector.
2. The Operating System
I opted for the most recent Raspbian Jessie Lite version, as I wanted as little overhead as possible for the smooth operation of the camera (and maybe later a nextCloud service). Download the ZIP from this site and unzip the resulting image file to the hard disk of your local machine.
2.1 Preparing the SDHC memory card
Then insert the microSDHC card into the card reader of your local machine and check if it has a single partition which is formatted to fat32. Normally these cards are shipped pre-formatted and you do not have to do anything. The features should look as follows:
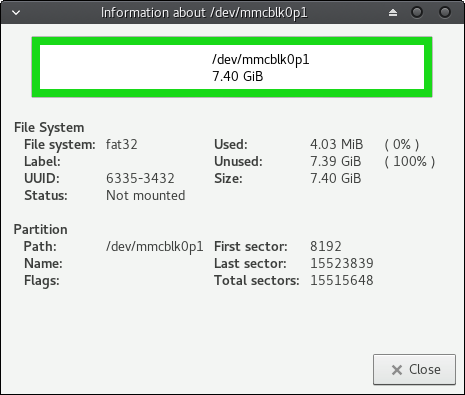
Remember the path of the microSDHC card which is /dev/mmcblk0p1. You will need part of this path in the next step when you copy the image you downloaded to the memory card.
2.2 Copying the image to the card
Before you copy the image, make sure that you unmount the card. Depending on your OS, the card may be mounted under /media/335-3432/ (Ubuntu), /media/user_id/335-3432/ or /run/media/user_id/335-3432/ (Manjaro). You can find this mount point by opening your file explorer, clicking on the link to the SDHC card and looking at the address bar in the top. The numbers at the end of the path may of course vary.
[alert type=”warning” icon-size=”normal”]Keep in mind that the mount point and the path of the card are not identical. You must unmount the card from the mount point and not from its /dev path.[/alert]
After unmounting copy the image file you unzipped to your card using the dd command from the terminal. The of= path should be the path of the card you retained at the end of section 2.1 without the partition indication. If the path was is /dev/mmcblk0p1, the corresponding out file parameter in the dd command should be: of=/dev/mmcblk0.
[alert type=”danger” icon-size=”normal”]Think twice before you apply dd. Make sure you have the right /dev/mmblk... device in case you have more than one card connected to your machine. And – above all – do not confuse if and of parameters or you will risk fucking up your data or even your OS. dd is nick named “disk destroyer” for a reason.[/alert]
Here is how my card gets flashed with Raspbian:
|
1 2 |
[ilek@nordic ~]$ sudo unmount /dev/mmcblk0p1 [ilek@nordic ~]$ dd bs=4M if=2017-04-10-raspbian-jessie-lite.img of=/dev/mmcblk0 |
After a while, your card should be flashed.
3. Preparing your image
Many of the tuorials on getting your Raspberry started recommend connecting your device to a monitor and a keyboard and setting up the remaining parameters. Apart from the fact that I newver liked fiddling around with cables on a Raspberry board which is intended to run as a standalone computer, this does not work for a Raspberry Zero. The reason is that there is only a micro USB plug while cable keyboards will have a “grown out” standard USB connector. The better way is to pre-edit the image before booting. The following description is based on David Maitland’s tutorial on the Pi Zero headless setup (no longer online, archived version) .
3.1 Add network key
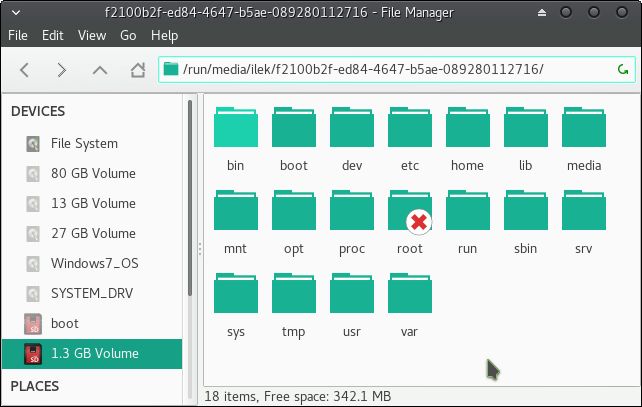
Remount the SDHC card with the image flashed. After running the sync command from your terminal you can just eject and reinsert the card to get it mounted. Open your file explorer and you should see two mount points referring to the card: one is labeled boot, the other one comes up as a 1.3 GB volume – which suggests that a cheaper 4 GB card probably would have been sufficient. Click on the “non-boot” partition and copy the path in the address field to your clipboard.
Then in the terminal window, cd to that directory, and afterwards cd to etc/wpa_supplicant/. Use sudo vim to edit the wpa_supplicant.conf file:
|
1 2 3 |
[ilek@nordic ilek]$ cd /run/media/ilek/f2100b2f-ed84-4647-b5ae-089280112716/ [ilek@nordic f2100b2f-ed84-4647-b5ae-089280112716]$ cd etc/wpa_supplicant/ [ilek@nordic wpa_supplicant]$ sudo vim wpa_supplicant.conf |
Your wpa_supplicant.conf should look as follows:
|
1 2 3 4 5 6 7 8 9 |
country=DE ctrl_interface=DIR=/var/run/wpa_supplicant GROUP=netdev update_config=1 network={ ssid="___Name_of_your_WIFI_network" psk="___your wifi password" key_mgmt=WPA-PSK } |
[alert type=”warning” icon-size=”normal”]Raspbian is extremely picky with the syntax. Even a space before and after the equals sign can enough to derail the parsing of the wpa_supplicant.conf file at boot time.[/alert]
3.2 Setup static IP
New Raspbian Stretch Lite Edition
[alert type=”info” icon-size=”normal”]Since Raspian Stretch static IPs are no longer set up in /etc/network/interfaces but in /etc/dhcpcd.conf[/alert]
There is no need to edit /etc/dhcpcd.conf to set up name servers, either. The only file you need to edit is the /etc/dhcpcd.conf file as follows:
|
1 2 3 4 5 6 7 8 9 10 11 |
# Example static IP configuration: #interface eth0 #static ip_address=192.168.1.72/24 #static routers=192.168.1.1 #static domain_name_servers=192.168.1.1 interface wlan0 static ip_address=192.168.1.62/24 static routers=192.168.1.1 static domain_name_servers=192.168.1.1 8.8.8.8 |
PreVious Raspbian Jessie Lite Edition
Unless you are very good at setting up network discovery services, it is a good idea to configure your Raspberry device with a static IP so that you can always be sure about the address under which you can access the device on your network.
Setting the IP address and other related stuff is done by editing etc/network/interfaces with sudo vim. At the end of your edit, your interfaces file should look like this (where the IP address and the gateway may of course differ depending on the setup of your network):
|
1 2 3 4 5 6 7 8 9 10 11 12 13 14 15 16 17 18 |
# Include files from /etc/network/interfaces.d: source-directory /etc/network/interfaces.d auto lo iface lo inet loopback iface eth0 inet manual allow-hotplug wlan0 iface wlan0 inet address 192.168.1.8 netmask 255.255.255.0 gateway 192.168.1.1 wpa-conf /etc/wpa_supplicant/wpa_supplicant.conf allow-hotplug wlan1 iface wlan1 inet manual wpa-conf /etc/wpa_supplicant/wpa_supplicant.conf |
As the Raspbian image is already pre-configured to use the iconic 8.8.8.8 and 8.8.8.4 DNS servers from Google, this step is rather optional. Skip it if you are fine with Google logging your DNS queries, or – if you are paranoid – edit etc/resolv.conf and replace the DNS IPs by a pair of servers you think you can trust more. You can choose such a server from here.
3.3 Activate SSH
Raspberry ships their Raspbian images with ssh deactivated by default. This of course is bad news if you want to run a headless confiuration from scratch. You have to be sure that you can access your Pi zero by ssh over the network.
Now comes the moment where we have to work on the boot partition of the image. Again, the easiest way to find the address of boot is to open your file browser and click on the boot partition of the SDHC card in the Devices section. Then copy the path to the clipboard as before und run cd + paste in your terminal.
|
1 2 |
[ilek@nordic etc]$ cd /run/media/ilek/boot/ [ilek@nordic boot]$ touch ssh |
4. Boot your Pi
Your Pi is now ready for booting. Unmount the SDHC card and remove it from your workstation and plug it into your pi. Connect it to the power cable of an Android USB charger and wait ~ 45 sec until it has completely booted.
Then ssh into the Pi using the IP address you assigned it in the etc/network/interfaces of section 3.2. The default password for the Pi is.. guess what? Yes, it’s raspberry.
[alert type=”warning” icon-size=”normal”]Do not forget to change the password using the passwd comand once you have logged into your pi.[/alert]
5. Adding authorized keys
Instead of password authentication it is usually more convenient to set up a key based authentication. As the Pi0W will normally only be passively involved in remote log in procedures – i.e. the Pi0W will be the host on which someone remotely logs in but nobody will remotely log in from the Pi0W onto another host – we do not even need to create the key-pair but just set up the .ssh directory:
|
1 2 3 |
pi@pi0:~ $ mkdir .ssh pi@pi0:~ $ chmod 700 .ssh pi@pi0:~ $ vim .ssh/authorized_keys |
Copy the id_rsa.pub public key of the client machine into the authorized_keys file on the Pi0W.
Set the access rights for the authorized_keys file to 600:
|
1 |
chmod 600 .ssh/authorized_keys |
Log out from your Pi0W and check if relogging in from the client machine can be done by public key authentication. If this is the case, you may want to switch off password authentication completely by uncommenting the PasswordAuthenticationflag in the /etc/ssh/sshd_config file and setting it to no on the Pi0w:
|
1 2 3 |
# To disable tunneled clear text passwords, change to no here! PasswordAuthentication no #PermitEmptyPasswords no |
Reboot the Pi0w to activate the new configuration.