
A couple of years ago I recommended using gnuPlot for producing high quality plots of functions and time series. There has been a lot going on in data visualization since then and while I gnuplot still remains my favourite plotter, there has been an interesting addition for fast and frugal function plotting in the field of high school mathematics (and also geometry): GeoGebra.
The question is: Is there a way to import Geogebra output into a LaTeX document. Not as a PNG of course but asLaTeX compliant code(like TikZ or PSTricks). The answer is – yes, there are even a few ways to skin that cat…
Local Geogebra Installation needed
First thing you need to know: You cannot export to LaTeX code with the online version. You need a local installation of a so called Geogebra Classic on your machine. Geogebra Classic is kind of Geogebra online plus some more features – and among these some more features is an option to export as TikZ.
So go to Geogebra’s download page and get the install files for your OS.
Don’t Say Export – Say Download as
The instructions in the Geogebra Wiki are apparently outdated and refer to a previous version of Geogebra Classic:
Just drag a selection rectangle around the portion of the construction you need to export (or resize the GeoGebra window), then select File -> Export -> Graphics View as
Geogebra Classic Wiki
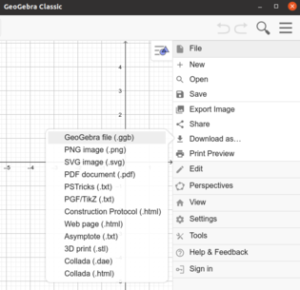
This won’t work because File -> Export will force you to export your result as a PNG file – but not as TikZ code.
The correct way is to Choose File -> Download as -> and then pick export as PGF / TikZ. I first tried PS Tricks but failed to integrate it correctly into my LaTeX code.
The resulting PGF / TikZ file is a text file – just what we need to put it into our LaTeX code.
Texmaker users
Geogebra suggests TikZ export files to be saved with a .txt extension. Those who use Texmaker might find it expedient to change the file extension into .tex before saving. This facilitates the opening and editing and compilation in Texmaker.
Open export file in Texmaker
Lets assume our export file geogebra.tikz looks as follows:
|
1 2 3 4 5 6 7 8 9 10 11 12 13 14 15 16 17 18 19 20 21 22 23 24 25 26 27 28 29 30 31 32 |
\documentclass[10pt]{article} \usepackage{pgfplots} \pgfplotsset{compat=1.15} \usepackage{mathrsfs} \usetikzlibrary{arrows} \pagestyle{empty} \begin{document} \definecolor{ududff}{rgb}{0.30196078431372547,0.30196078431372547,1} \begin{tikzpicture}[line cap=round,line join=round,>=triangle 45,x=1cm,y=1cm] \begin{axis}[ x=1cm,y=1cm, axis lines=middle, ymajorgrids=true, xmajorgrids=true, xmin=-5.524545454545454, xmax=6.657272727272723, ymin=-5.484380165289265, ymax=6.730495867768597, xtick={-5,-4,...,6}, ytick={-5,-4,...,6},] \clip(-5.524545454545454,-5.484380165289265) rectangle (6.657272727272723,6.730495867768597); \draw [line width=2pt,domain=-5.524545454545454:6.657272727272723] plot(\x,{(--6-2*\x)/4}); \begin{scriptsize} \draw [fill=ududff] (-3,3) circle (2.5pt); \draw[color=ududff] (-2.8633884297520673,3.3503305785123945) node {$A$}; \draw [fill=ududff] (1,1) circle (2.5pt); \draw[color=ududff] (1.1366115702479314,1.3503305785123931) node {$B$}; \draw[color=black] (-5.375785123966942,4.110661157024793) node {$f$}; \end{scriptsize} \end{axis} \end{tikzpicture} \end{document} |
As you can see, PGF/TikZ has produced a standalone LaTeX code that you can directly compile to a DVI, PS, PDF or whatever you desire as a target system.
Ubuntu 20.04 LTS users need to edit code
Although the above code is in line with latest TikZ coding standards, LaTeX will produce an error. This is because the default Ubuntu software sources install a TeX Live 2019 installation which has outdated coding standards for TikZ. Read below what to do.
Editing needed for default LaTeX in Ubuntu 20.04 LTS
In case you are running a default LaTeX installation from the Ubuntu Software Sources, your LaTeX run will probably stall with a cryptic error message like this one:
|
1 2 |
! Argument of \pgfmathfloatparse@@ has an extra }. <inserted text> \par l.30 \end{axis} ! Paragraph ended before \pgfmathfloatparse@@ was complete. <to be read again> \par l.30 \end{axis} |
A posting on Stack Overflow has the solution. The circle commands in lines 24 and 26 follow TeX Live 2020 syntax conventions, while Ubuntu’s apt installs Tex Live 2019. Therefore we have to edit our Geogebra export file and replace each line with slightly modified circle command. Line 24 is changed from:
|
1 |
\draw [fill=ududff] (-3,3) circle (2.5pt); |
to…
|
1 |
\draw [fill=ududff] (-3,3) circle [radius=2.5pt]; |
Line 26 has to be changed the same way. You can use a regex-based command to change each occurence of the circle command from the current TeX Live 2020 syntax to the deprecated 2019 syntax in the geogebra.tex file or use Texmaker’s regex based Replace All feature:
|
1 |
sed -i -E 's/circle \((\d+\.?\d*[a-z]+)\)/circle [radius=$1]/g' geogebra.tex |
Once you have rolled back the circle commands to the deprecated TeX Live 2019 syntax that your Ubuntu LaTeX installation uses, you can produce a DVI, PS or PDF from that code. The result should be a single neat page with the plot you exported.
Integrating plots into other TeX documents
Normally though, you do not want to produce a standalone document but you want your graphics to appear in another TeX document (e.g. a sheet with solutions to homework assignments), which I will call the “master document”. In order to achieve this, you have to:
- Copy lines 2-5 from geogebra.tex file into the preamble of your master document. These lines contain package imports and settings TikZ needs for plotting
- Copy any
\definecolorcommands like the one in line 8 from your geogebra.tex file into the section following the\begin{document}tag in your master document. - Copy the complete section starting from
\begin{tikzpicture}to\end{tikzpicture}to the desired place in your master document. If you want, you can put the document into a figure environment and scale it as needed.
You should now be able to tex your master document with a neat sketch exported from Geogebra.