When developing GUI applications for Python, PyGTK expects the the coder to define the complete layout of the GUI with its objects and the corresponding wiring of events, signals and actions in the code. This can be quite tedious, and fortunately there is Glade which is UI designer that allows to graphically layout a window. It then produces an XML file that can be added to the Python code. One question that remains is: How can I add custom widgets that extend standard Gtk widgets to Glade? This is what I am going to demonstrate in this post.
1. Definition of “custom widget”
There are two cases that are covered by the term custom widget:
- A group of two or more standard widgets that are dubbed composite widgets in Glade. The typical show case for composite widgets is a GtkLabel that serves as a description for a GtkEntry next to it (there is also a YouTube video corresponding to the slides).
- An extension of an existing standard widget that is obtained by sub-classing and exposes and/or overrides additional properties, methods, signals – the usual stuff you would expect with sub-classing.
We will focus on the second case, i.e. a custom widget that we derive as a subclass from a standard Gtk widget. I will demonstrate this with the AwsomeTextView subclass that has been derived from the standard Gtk.TextView adapted from this askubuntu.com discussion. Although this discussion dates back 10 years, for me it’s still the most useful set of instructions I have been able to find on the net.
2. What we need to achieve the above
We have two challenges to overcome in our custom widget exercise:
- Organize the housekeeping inside Glade: Glade needs to know what custom widget it should take to its toolbox, from which standard Gtk widget class it is derived, what placeholder icon is used in the toolbox, what properties and methods the widget exposes, what signals it should feature and connect to potential callback functions.
- Import the custom widget into the code of our final application. This includes both the import of the code module belonging to our custom subclass as well as the
xmlinformation for theGtk.Builder.
2.1 Set up Glade to feature a custom widget
In its current version 3.22, Glade needs two things for processing a custom widget: an xml file dubbed catalog file that holds information such as the name of the widget, the widget group it belongs to, the parent widget it extends, the icon that should be used for the widget in the placeholder, etc.
Secondly, we need a Python file called module file that holds the usual subclass code of the custom widget: name of the subclass, the parent class it extends from, additional properties and methods exposed, overrides, etc.
2.1.1 Catalog XML file
Older versions expect this file to be saved in some /usr/.../glade/catalogs directory or similar. In Ubuntu 20.04 LTS with the standard apt (not snap) installation of Glade, the directory would be /usr/share/glade/catalogs. More recent version of Glade allow to specify extra catalog paths that are scanned for catalog xml files.
As the catalog file is also needed for the final application, it is therefore recommendable to save directly in the application directory and add the directory path as an extra catalog path in the Glade Preferences. This way we avoid having to fiddle around with the PYTHONPATH environment variable on our system.
From other samples I found on the internet, I have composed the following catalog file awsome_text_view.xml for my AwesomeTextView widget that I want to add as a custom widget to the Glade toolbox:
|
1 2 3 4 5 6 7 8 9 10 11 12 13 14 15 16 17 |
<glade-catalog name="awesome_text_view" library="gladepython" domain="glade-3" depends="gtk+"> <init-function>glade_python_init</init-function> <glade-widget-classes> <glade-widget-class title="Awesome TextView" name="AwesomeTextView" generic-name="awesome_text_view" parent="GtkTextView" icon-name="widget-gtk-textview"/> </glade-widget-classes> <glade-widget-group name="python" title="Python"> <glade-widget-class-ref name="AwesomeTextView"/> </glade-widget-group> </glade-catalog> |
A few words on the structure of catalog files:
- The first part is the catalog header (lines 1-4). Among other attributes, this section includes the
catalogname, thelibraryname. Note that the catalog name does not have to be identical to the file name you use for storing thexmlcatalog file. - The init function (line 6) – which as far as I can observe – always seems to be
glade_python_init. No idea why it must be there. For this demonstration at least, I found out that the init function line can be commented out. - The specification of each Glade widget class in the
<glade-widget-classes>section. A lot of catalog examples I have come across omit theparentproperty. This is important though, as it tells Glade from which existing class the new custom widget is expected to inherit. What is also often omitted is theicon-nameproperty: This determines what little icon is shown when the toolbox is opened in Glade by clicking the button with the 3 vertical dots next to theDisplaybutton in the object header of Glade’s center pane. - Recent versions of Glade also expect the catalog to include a
glade-widget-groupsection that determines under which widget group the widgets in the catalog are shown when clicking on the button with the 3 vertical dots right of theDisplaybutton. The title settings determines under which global category the widget is listed. The glade-widget-class-refnameproperty has to be in line with thenameproperty in the respectiveglade-widget-class sectionabove.
What’s the role of the
init function in line 6?Note that the catalog file is sufficient for Glade to show an icon in the toolbox, allow the user to drag the icon into the UI design window, work on properties and signals of the custom widgets (at least as far as properties and signals are concerned that are inherited from the base class of the Gtk standard widget) and to save it as a .glade file that can later be read by the Gtk.Builder of the app using the custom widget.
2.1.2 Module Python file
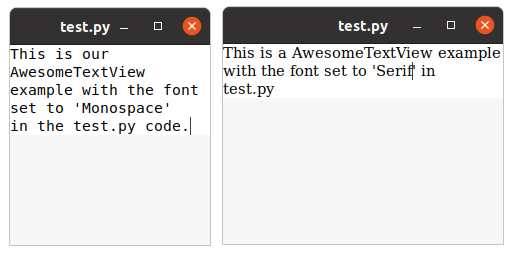
The module file is a typical Python class file. In our example, it just exposes another set_font() method (lines 11-12), to which we can pass a Pango.FontDescription compliant string like 'Monospace':
|
1 2 3 4 5 6 7 8 9 10 11 12 |
from gi.repository import Gtk, Pango class AwesomeTextView(Gtk.TextView): __gtype_name__ = 'AwesomeTextView' def __init__(self): Gtk.TextView.__init__(self) def set_font(self, font_description): self.modify_font(Pango.FontDescription(font_description)) |
On my Ubuntu, Glade has a module directory under /usr/x86_64-linux-gnu/glade/modules where module files traditionally were expected to save. For the sake of simplicity, we will put the module file directly into the application development directory.
Note that prior to subclassing, we have to import Gtk (and in our special case Pango) from the gi.repository (line 1).
The __gtype_name__ assignment (line 6) is related to the type identification in Python.
__gtype_name__ (line 6) is important because it is the link between the class declaration in the catalog file and the class code in the module file. Therefore __gtype_name__ must be assigned the same string as the glade-widget-class attribute name in the catalog file (line 9 in the catalog file of section 2.1.1).2.2 The “test driver” app
Now lets test if our AwesomeTextView custom widget behaves as expected when we make use of it in an app. For sake of simplicity we will keep all files in the same development directory. What we need is a .glade file that defines what our GUI looks like and a Python application code.
2.2.1 Glade output file

The first thing we have to do is make Glade aware that there is a custom catalog with information on our AwesomeTextView widget waiting for it in our app development directory. In order to achieve this, we open Glade, pick Preferences from the main menu and enter the path to our app development directory holding the custom catalog xml file under Extra catalog paths.
Remember: The custom catalog file is the file we created in section 2.1.1. Make sure that the module file from section 2.1.2 is also located in this directory.
Saving our GUI in Glade leaves us with a .glade output file which is actually another xml file. In the next step we will have the Gtk.Builder class read all We can pass to the Gtk.Builder of our application. Although this file has a .glade extension, it is in reality an xml file and can be opened with any text editor.
Unlike out catalog file and the module file, this file is an output file by Glade and not something we have to feed into Glade – but as we need inject the trinity of catalog file, module file and Glade output file into our application code, I have presented the file here.
The test.glade file for our application looks as follows:
|
1 2 3 4 5 6 7 8 9 10 11 12 13 14 15 16 17 18 19 20 21 22 23 24 25 26 27 28 29 30 31 32 33 34 35 36 37 |
<?xml version="1.0" encoding="UTF-8"?> <!-- Generated with glade 3.22.2 --> <interface> <requires lib="gtk+" version="3.20"/> <requires lib="awesome_text_view" version="0.0"/> <object class="GtkWindow" id="win1"> <property name="can_focus">False</property> <signal name="delete-event" handler="on_win1_delete_event" swapped="no"/> <child type="titlebar"> <placeholder/> </child> <child> <object class="GtkBox"> <property name="visible">True</property> <property name="can_focus">False</property> <property name="orientation">vertical</property> <child> <placeholder/> </child> <child> <object class="AwesomeTextView" id="atv1"> <property name="visible">True</property> <property name="can_focus">True</property> </object> <packing> <property name="expand">False</property> <property name="fill">True</property> <property name="position">1</property> </packing> </child> <child> <placeholder/> </child> </object> </child> </object> </interface> |
Note that our glade file in line 5 references our awesome_text_view catalog from before. Further note that we have connected a delete_event to an handler on_win1_delete_event for our application window that we gave the id win1. We will have to provide that handler in the Python module file.
2.2.2 Python application code
Our test.py code looks as follows:
|
1 2 3 4 5 6 7 8 9 10 11 12 13 14 15 16 17 18 19 20 21 22 23 24 |
import awsome_text_view import gi gi.require_version('Gtk', '3.0') from gi.repository import Gtk class App(): builder = Gtk.Builder() def __init__(self): self.builder.add_from_file('test.glade') win1 = self.builder.get_object('win1') atv1 = self.builder.get_object('atv1') atv1.set_font('Verdana') win1.show() def on_win1_delete_event(self, widget): Gtk.main_quit() if __name__ == '__main__': app = App() Gtk.main() |
The import instruction in line 1 references our module file from section 2.1.2. This module file must be present in our application development directory under the same name – in this case awsome_text_view.py.
3. Result
Depending on whether we put ‘Monospace‘ or ‘Serif‘ as a string into the set_font method in the application code in line 15, we obtain the following two results for our AwesomeTextView test driver application: