Sharing folders between a VirtualBox host and a client is normally presented as a no-brainer: Insert the (virtual) guest addons CD on the client machine, have the addons installed, go into the shared folders settings of the VirtualBox Host installation and start working. However things can get tricky at two moments:
- When you have to adapt the correct file and directory privileges for a shared resource (both on the host machine as well as on the client). This is where we have to dive into the
chmodandchownworld. - When you have no desktop client system where you just can flip in the guest additions CD and install the necessary software on the client system. This is the first hurdle to take when you want to share a folder from your (desktop) host system with a (console) server running in the VirtualBox.
1. What I wanted to achieve … and why
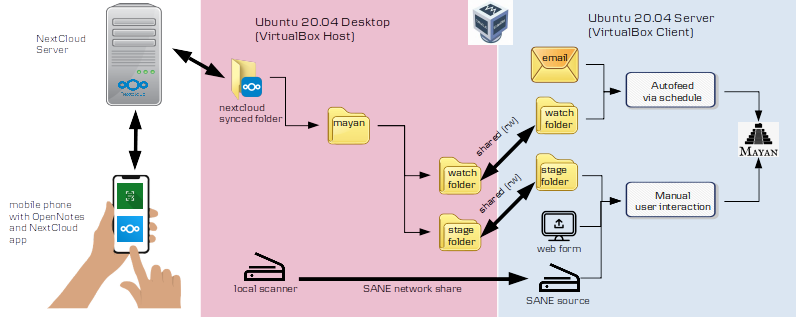
In my situation I am running a Mayan EDMS installation on a Ubuntu 20.04 Server in a VirtualBox. Documents can be fed into Mayan on different routes that Mayan calls “sources“.
The most straightforward way to feed a document into Mayan by web form upload. This involves just dragging and dropping a document to an upload zone shown on a Mayan browser page. Very similar to Dropbox and the likes.
But there are a couple of more sophisticated ways (“sources”) to get documents into Mayan. These can be email accounts that Mayan or watch folders that Mayan scans at regular intervals. In case Mayan finds any documents inside these folders or mail accounts, it automatically downloads them, checks them in as documents and finally. Furthermore, Mayan allows staging folders that precollect the documents that a user can then manually check in.
Now my setup with respect to watch and staging folders looks as follows:
Scanner icons from seekpng.com. Mobile Phone in Hands Icon from pixabay.com. Upload Computer icon from thenounproject.com. OpenNote Scanner, Nextcloud and Mayan EDMS logos from respective software developers. All other graphic elements from LibreOffice clip art collections.
So with respect to our shared folders we want to share the watch folder on our Ubuntu desktop machine at /home/someuser/nextcloud/mayan/watch to /home/mayan/watch in our Ubuntu 20.04 Server which runs in VirtualBox.
Note that the mayan user on the Ubuntu 20.04 server needs the same access rights (inlcuding read and write privileges) as the user username on the desktop host machine:
- Anything which is added to the watch and staging folders on the Ubuntu 20.04 desktop host system – be it directly or through uploads to the folder from a Nextcloud (e.g. by mobile or web upload) should be reflected as an addition in the shared folder on the Ubuntu 20.04 Server side.
- Anything which is deleted by or through Mayan EDMS on the server side inside the watch and staging folders should be reflected in the Nextcloud folder.
Step 1: Install VirtualBox addons on the server
The first thing we need is a VirtualBox Addons on the server side. I followed these instructions on tecnstuff.net and it worked quite smoothly. The only trouble I ran into was that I was first unable to Insert the VM Guest Addons CD and got the following message:

The solution to this problem can be found at askubuntu.com: Basically, you have to first shut down the server, then go to the Storage settings of your virtual server, remove whatever VDMI image is there under IDE drives, then restart the server. Do not start the server headless – you need the main window with the Devices – Insert Guest Additions CD Image... menu. Then you should be able to insert the image without an error message. Continue with the instructions from tecnstuff.net: Create a directory for the virtual CD mount, mount the image and install the Guest Additions.
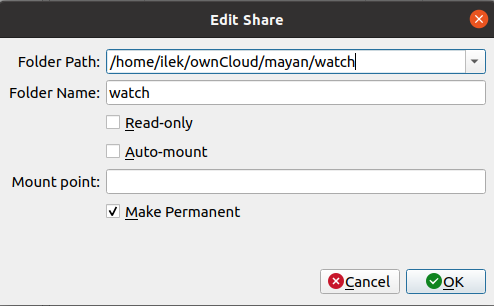
2. Add settings for the shared folder on the host machine
Shut down your Ubuntu Server. In the VirtualBox manager on your Ubuntu desktop add the settings for your shared folder:
3. Add entry in /etc/fstab on the server side
First thing we need is a mount point in our /home/mayan directory. Keep in mind that this directory is in user mayan‘s /home and should be owned by mayan. We will first set the access privileges as generous as possible (chmod 777). This will be adjusted by the fstab settings in the next step:
|
1 2 3 |
ilek@mayan2:/home/mayan$ sudo -u mayan mkdir /home/mayan/watch ilek@mayan2:/home/mayan$ sudo chown mayan:mayan watch ilek@mayan2:/home/mayan$ sudo chmod -R 777 watch |
Finally to have a permanent mount, we need to add an entry in our /etc/fstab configuration file:
|
1 |
watch /home/mayan/watch vboxsf rw,exec,uid=1001,gid=1001,dmode=755,fmode=644 0 0 |
uid and the gid reported in your /etc/fstab entry corresponds to the mayan user on your server. You can find that user id by issuing id -u mayan at the command prompt of the server’s terminal.Now shutdown your server.
4. Test the setup
Reboot the server. You should now be able to perform the following tests successfully:
- If you run ls -alh from /home/mayan, you should get the following access and ownership information for your watch directory. It’s important that on the server the watch directory is owned by mayan:mayan and that the owner has full access to that directory:
|
1 2 3 4 |
ilek@mayan2:/home/mayan$ ls -alh total 32K [...] drwxr-xr-x 1 mayan mayan 4.0K Mar 9 11:19 watch |
- Next from on your Ubuntu desktop host or from any device that allows a Nextcloud upload to the Nextcloud watch folder, add some file (preferably a text file). Check if the upload is mirrored (1) in your Nextcloud, (2) on your local mirror directory on the desktop host machine and – above all – (3) in the
/home/mayan/watchdirectoryof the server. - In
/home/mayan/watchon the server check if you have read access to the file by. Note that you must impersonate usermayanby issuing some command likesudo -u mayan cat mytestfile.tex. - Again in /home/mayan/watch on the server, check if user mayan has the privilege to delete any document by issuing a command like
sudo -u mayan rm mytestfile.tex. Check if the local folder on the desktop machine reflects the deletion and if it is synced in the Nextcloud instance.