Stay tuned for another blog post on installing and configuring a fully loaded Bacula factory with Bacularis for Docker.
As mentioned above, my recommendation is to simply install the complete Bacula suite as a Bacularis Docker container. As such, any of the following instructions is obsolete. There might be cases, though where preference is given to running Bacula from a direct deployment instead of from an Docker container. It is primarily for such cases that I have left this post online.
For testing purposes, I will install Bacula and Baculum inside a Ubuntu multipass machine. So part of these installation notes will not only deal with the Baculum installation but also with port forwarding from the multipass virtual machine to the host machine and from the host machine to the outside world.
1 Create multipass instance
Launch a Multipass instance and after creation has finished, get a bash command prompt:
|
1 2 3 4 5 6 |
ilek@q556:~$ multipass launch jammy --name demobacu Launched: demobacu ilek@q556:~$ multipass exec demobacu bash To run a command as administrator (user "root"), use "sudo <command>". See "man sudo_root" for details. ubuntu@demobacu:~$ |
jammy by focal in the commands above and in all subsequent steps. The reason is that the Baculum GUI currently only offers repos that are officially released for
20.04. From my experience, these install smoothly with 22.04, too. But if you really want to be on the safe side, you should rather stick to focal for the time being.2 Install Bacula CE
In order to access the Bacula repos, you have to register once on the registration page. After registration you will be given a link to your personal repository. The link contains your personal key, which you have to note down as you will need it later for setting up your apt Bacula repository. My link looked like this and the bold part of the link is the key: https://www.bacula.org/packages/alphanumerickey/
If you open the link, you will be directed to a site that looks like this:
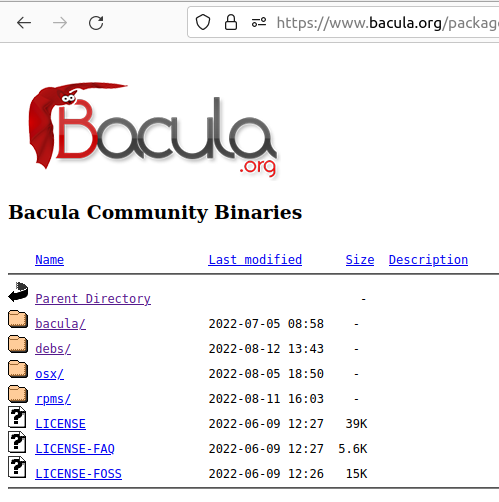
Go into debs, 13.0.1 (or whatever version of Bacula you might wish to install), then into dists, pick the version of your host machine (in my case jammy), then main, then binary-amd64. Then click on INSTALL which should open a text window with detailed installation instructions.
The instructions are more or less straightforward and there were only a few moments where I was not really sure what to. Therefore my advice is to follow the instructions keeping in mind the following clarifications:
Start by installing some apts and by adding the package signature key to your apt manager:
|
1 |
ubuntu@demobacu:~$ sudo apt install apt-transport-https |
Download the Bacula signature key and activate it in your apt:
|
1 2 |
ubuntu@demobacu:~$ wget https://bacula.org/downloads/Bacula-4096-Distribution-Verification-key.asc ubuntu@demobacu:~$ sudo apt-key add Bacula-4096-Distribution-Verification-key.asc |
You will get a warning about apt-key being deprecated, which you can handily ignore.
Now edit the following file with vim:
|
1 |
ubuntu@demobacu:~$ sudo vim /etc/apt/sources.list |
Include the following entry:
|
1 2 |
# Bacula deb https://www.bacula.org/packages/_your__key_here_/debs/13.0.1 jammy main |
Now run an apt update. Again, you will get a warning about apt-key deprecation which is irrelevant in this context. Proceed as instructed in the guide and install
|
1 2 |
ubuntu@demobacu:~$ sudo apt update ubuntu@demobacu:~$ sudo apt install dbconfig-common postgresql |
This will install quite a few dependencies on the machine. At the end 163 MB of additional space are occupied on my machine.
Now comes the main dish: We are ready to install Bacula:
|
1 |
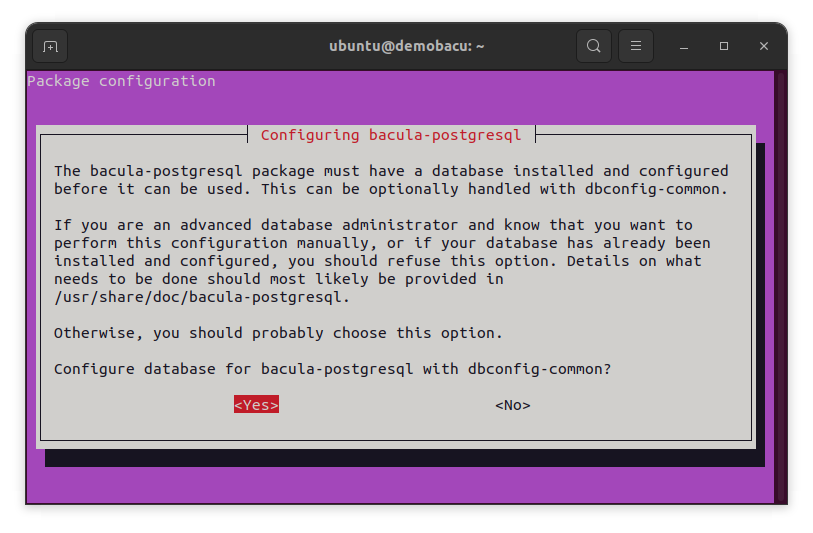
ubuntu@demobacu:~$ sudo apt install bacula-postgresql |
You will be directed to a text based package configuration dialog. Answer Yes to the first question:
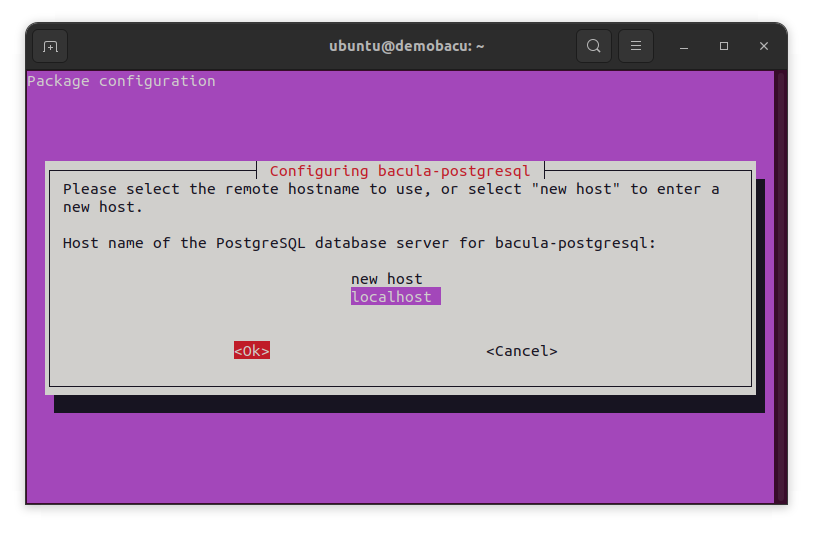
The next one will ask you about what PostgreSQL server you want to use. As we just installed a local database server inside our multipass instance, we choose localhost.
The next step has caused some confusion for me. It asks to provide a password to register with the database server. So this left some questions open for me:
- What user does this password refer to? Is it for the default superuser
postgresor for the database ownerbacula? - Do I have the authentication in
/etc/postgresql/14/main/pg_hba.confset toidentas mentioned in the dialogue? - Is it better to leave the password empty so that a random password will be generated?
The answers are: The password which is asked for here, refers to the user bacula (not to the postgres superuser). I generated a random password for myself entered it, confirmed it again in the next dialogue and kept it in my KeePassX password storage. And the pg_hba.conf settings work just fine.
table prefer wearing coin shelter magically candle are likely to exceed this limit. Therefore use a (shorter) randomly generated string like FERT458m4G//.We can now have a quick look into the PostgreSQL server to check if everything has been created according to plan:
|
1 2 3 4 5 6 7 8 9 10 11 12 13 14 15 16 17 18 19 20 21 22 23 24 |
List of relations Schema | Name | Type | Owner --------+----------------+-------+-------- public | basefiles | table | bacula public | cdimages | table | bacula public | client | table | bacula public | counters | table | bacula public | device | table | bacula public | events | table | bacula public | file | table | bacula public | filemedia | table | bacula public | fileset | table | bacula public | job | table | bacula public | jobhisto | table | bacula public | jobmedia | table | bacula public | location | table | bacula public | locationlog | table | bacula public | log | table | bacula public | media | table | bacula public | mediatype | table | bacula public | object | table | bacula public | path | table | bacula public | pathhierarchy | table | bacula : |
Exit the listing by hitting q. Then exit the psql client by entering \q. The Bacula components (director, storage daemon, file daemon) should be running on your machine now:
|
1 2 3 4 5 6 7 8 9 10 11 12 |
ubuntu@demobacu:~$ sudo service bacula-dir status ● bacula-dir.service - Bacula Director Daemon service Loaded: loaded (/lib/systemd/system/bacula-dir.service; enabled; vendor prese> Active: active (running) since Mon 2022-09-12 19:02:43 UTC; 33min ago Main PID: 8321 (bacula-dir) Tasks: 5 (limit: 1116) Memory: 2.7M CPU: 32ms CGroup: /system.slice/bacula-dir.service └─8321 /opt/bacula/bin/bacula-dir -fP -c /opt/bacula/etc/bacula-dir.c> Sep 12 19:02:43 demobacu systemd[1]: Started Bacula Director Daemon service. |
You can check if the status for bacula-sd (storage daemon) and bacula-fd (file daemon, which we actually don’t need here as it is intended to run on client to be backed up) the same way. If everything’s fine, proceed to the installation of the Baculum web GUI.
3 Install Baculum
3.1 Components of Baculum
While Baculum itself can be seen as an add-on component of Bacula in the sense that it is an optional GUI to facilitate the administration of Bacula which would otherwise take place in the bconsole, Baculum itself features two different components:
- Baculum API: This is a typical REST API in the style which we already know from services like the Mayan EDMS. It allows to send administrative commands to the Bacula director and receive its responses over
httpas an alternative to typing them into thebconsole. We can therefore communicate overcurlor write custom software in languages such as Python (using therequestsmodule or similar) to control the Bacula server.
Baculum API listens on port 9096 by default. - Baculum Web: This is a dashboard style GUI which allows to configure and monitor the Bacula server. Baculum Web communicates with other Bacula components using the Baculum API. Therefore, we can install Baculum API without Baculum Web but not vice versa.
Baculum Web listens on port 9095 by default.
3.2 Set up apt repos
First, inside our multipass machine, import the GPG key for the baculum repo:
|
1 2 3 4 |
ubuntu@demobacu:~$ sudo su root@demobacu:/home/ubuntu# wget -qO - http://www.bacula.org/downloads/baculum/baculum.pub | apt-key add - Warning: apt-key is deprecated. Manage keyring files in trusted.gpg.d instead (see apt-key(8)). OK |
Next, we add a file with the repository information under /etc/apt/sources.list.d/baculum.list: Create a file with vim, enter the following information and then save it:
|
1 2 |
deb [ arch=amd64 ] http://www.bacula.org/downloads/baculum/stable-11/ubuntu focal main deb-src http://www.bacula.org/downloads/baculum/stable-11/ubuntu focal main |
As initially mentioned, Baculum currently (Sep 2022) does not offer a repo for jammy, but the focal repo for the previous LTS version installs smoothly on 22.04 LTS, too.
While not mentioned in the official installation guide, this might be a good moment to update your apt sources:
|
1 2 3 4 5 6 7 8 9 10 |
root@demobacu:/etc/apt/sources.list.d# apt update [lots of output...] Fetched 1883 kB in 2s (1219 kB/s) Reading package lists... Done Building dependency tree... Done Reading state information... Done 3 packages can be upgraded. Run 'apt list --upgradable' to see them. W: http://www.bacula.org/downloads/baculum/stable-11/ubuntu/dists/focal/InRelease: Key is stored in legacy trusted.gpg keyring (/etc/apt/trusted.gpg), see the DEPRECATION section in apt-key(8) for details. W: https://www.bacula.org/packages/hereisyourkey/debs/13.0.1/dists/jammy/Release.gpg: Key is stored in legacy trusted.gpg keyring (/etc/apt/trusted.gpg), see the DEPRECATION section in apt-key(8) for details. root@demobacu:/etc/apt/sources.list.d# |
3.2 Apache or lighthttpd?
As Baculum requires a web server, it leaves us the choice between apache2 and lighthttpd. There is no recommendation whatsoever which server might be better under which circumstances. Based on my rudimentary knowledge about web servers, I would say that performance in this tiny setup where a single user contacts the server once a day or even week is not an issue and we should go for what is less ressource-hungry. Which I would expect to be lighthttpd.
3.3 Baculum API installation
|
1 2 3 |
root@demobacu:~# apt-get install baculum-common baculum-api baculum-api-lighttpd [after lots of output and quite some installation time] root@demobacu:/home/ubuntu# systemctl start baculum-api-lighttpd |
If we install lynx on the multipass machine we can try to access the API webpage with a text browser:
|
1 2 |
ubuntu@demobacu:~$ sudo apt install lynx ubuntu@demobacu:~$ lynx localhost:9096 |
After an alert message saying “Access without authorization denied — retrying”, we are asked for a user name for ‘Baculum Auth’ and then a password. In both cases, the username and password is admin as per the Baculum online documentation. After some further sermon, we are directed to the following landing page:
3.4 Baculum Web installation
While we could theoretically run Baculum Web on a different server, it’s (at least for our purposes) natural to choose the same web server as for the Baculum API installation. We therefore go for lighthttpd again.
|
1 2 |
ubuntu@demobacu:~$ sudo apt install baculum-common baculum-web baculum-web-lighttpd ubuntu@demobacu:~$ sudo systemctl start baculum-web-lighttpd |
As we have already installed the lighthttpd server the installation takes place in a second. Again we can try to connect to the web page by lynx:
|
1 |
ubuntu@demobacu:~$ lynx localhost:9095 |
In my case lynx again asks for a user name and a password, which shows that there is some response from the server. After that though, lynx shuts down telling me that a “Start file could not be found or is not in text/html or text/plain.” No worries here, we just wanted to see if the site responds at all – which it does. With a fully loaded browser like Firefox, everything will run smoothly.
3.5 Removal of Baculum installation
Just in case you want to undo your Baculum installation:
Remove port forwarding and close ports on host machine
For Baculum we had added PREROUTING and FORWARD and ufw-related general port opening instructions on the host machine. The easiest way to remove those is to find the following entries in /etc/iptables/rules.v4 and delete them:
|
1 2 3 4 5 6 7 8 9 10 11 |
[...] -A FORWARD -d 10.27.44.252/32 -p tcp -m tcp --dport 9096 -j ACCEPT -A FORWARD -d 10.27.44.252/32 -p tcp -m tcp --dport 9095 -j ACCEPT [...] -A ufw-user-input -p tcp -m tcp --dport 9096 -j ACCEPT -A ufw-user-input -p udp -m udp --dport 9096 -j ACCEPT -A ufw-user-input -p tcp -m tcp --dport 9095 -j ACCEPT -A ufw-user-input -p udp -m udp --dport 9095 -j ACCEPT [...] -A PREROUTING -i enp1s0 -p tcp -m tcp --dport 9096 -j DNAT --to-destination 10.27.44.252:9096 -A PREROUTING -i enp1s0 -p tcp -m tcp --dport 9095 -j DNAT --to-destination 10.27.44.252:9095 |
Now stop the reboot the host and check from an outside browser in the subnet if you can still access Baculum on ports 9095 and 9096. If everything went as planned, you should get a “Could not connect error” in your browser because not only has the host stopped to forward these ports to the multipass instance, but it also has closed these ports for any outside traffic.
Uninstall baculum Web and Baculum API
It’s enough to remove the Baculum Web, this wil also sweep automatically the Baculum API from the system. An additional autoremove will then do with the web server and all PHP dependencies which we have previously installed:
|
1 2 3 4 5 |
ubuntu@demobacu:~$ sudo systemctl stop baculum-web-lighttpd.service ubuntu@demobacu:~$ sudo apt remove --purge baculum-common baculum-web baculum-web-lighttpd ubuntu@demobacu:~$ sudo apt autoremove ubuntu@demobacu:~$ sudo rm -rf /var/cache/baculum ubuntu@demobacu:~$ sudo rm /etc/apt/sources.list.d/baculum.list |
We now remove the GPG key from the host machine’s apt key store following the instructions on askubuntu.com:
|
1 2 3 4 5 6 7 8 9 10 11 12 13 14 15 16 17 18 19 20 21 22 23 24 25 26 |
ubuntu@demobacu:~$ sudo apt-key list Warning: apt-key is deprecated. Manage keyring files in trusted.gpg.d instead (see apt-key(8)). /etc/apt/trusted.gpg -------------------- pub rsa4096 2018-09-03 [SC] 5235 F5B6 68D8 1DB6 1704 A82D C0BE 2A5F E9DF 3643 uid [ unknown] Bacula 4096 Distribution Verification Key (www.bacula.org) <kern@bacula.org> sub rsa4096 2018-09-03 [E] pub rsa2048 2015-03-07 [SC] 546E 19BB E5BD D219 644C 0851 E72D 44EC 5C3D BD51 uid [ unknown] Marcin Haba <marcin.haba@bacula.pl> sub rsa2048 2015-03-07 [E] /etc/apt/trusted.gpg.d/ubuntu-keyring-2012-cdimage.gpg ------------------------------------------------------ pub rsa4096 2012-05-11 [SC] 8439 38DF 228D 22F7 B374 2BC0 D94A A3F0 EFE2 1092 uid [ unknown] Ubuntu CD Image Automatic Signing Key (2012) <cdimage@ubuntu.com> /etc/apt/trusted.gpg.d/ubuntu-keyring-2018-archive.gpg ------------------------------------------------------ pub rsa4096 2018-09-17 [SC] F6EC B376 2474 EDA9 D21B 7022 8719 20D1 991B C93C uid [ unknown] Ubuntu Archive Automatic Signing Key (2018) <ftpmaster@ubuntu.com> ubuntu@demobacu:~$ sudo apt-key del 5C3DBD51 |
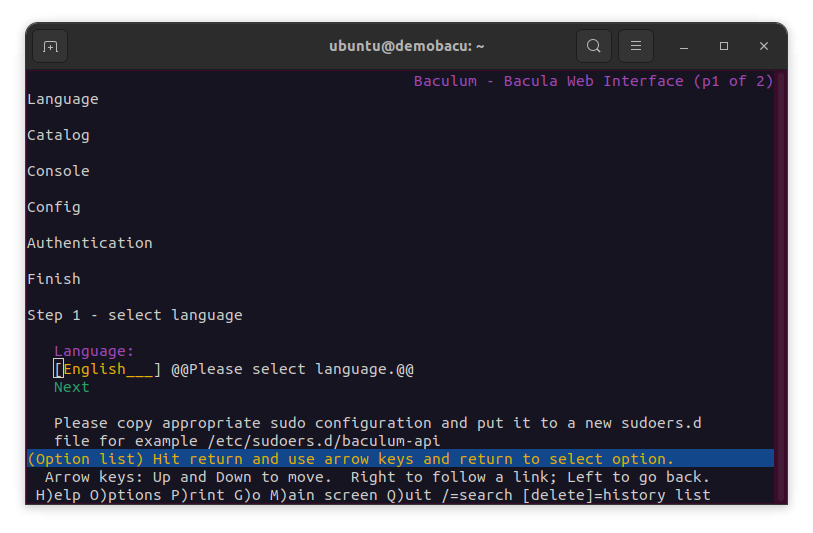
We are now ready to install the Baculum adminstration GUI. The installation will follow the official instructions on baculum.app.
4. Port Forwarding
As we have installed everything inside our demobacu multipass VM we are now having a bunch of services that are running inside the virtual machine. In particular, we would like to access Baculum Web on port 9095 and maybe the Baculum API (port 9096) from the outside. ‘Outside’ in this context means at least from the local network to which the host of the multipass VM (i.e. q556) is connected if not even from the WWW.
Therefore our port forwarding problem has two layers:
- How is traffic on these ports forwarded between the demobacu VM and the q556 host machine?
- How is traffic on these ports forwarded between the q556 host machine and any other machine connected to the same local network?
4.1 Exposing Baculum from the VM to the host
The (in this case) good news is that multipass will open any traffic between services running inside the VM and its host machine. We can check this as follows:
First we need the IP address under which we can reach the virtual machine. The easiest way is to consult the output of the multipass list command:
|
1 2 3 4 5 6 |
ilek@q556:~$ multipass list Name State IPv4 Image demobacu Running 10.27.44.252 Ubuntu 22.04 LTS ilek@q556:~$ ping 10.27.44.252 PING 10.27.44.252 (10.27.44.252) 56(84) bytes of data. 64 bytes from 10.27.44.252: icmp_seq=1 ttl=64 time=0.685 ms |
Next we give it a try with the lynx text-based browser again, this time from the outside:
|
1 2 |
ilek@q556:~$ lynx 10.27.44.252:9096 ilek@q556:~$ lynx 10.27.44.252:9095 |
In both cases we get a proper response from the lighthttpd server inside the VM. We can therefore conclude that services on the multipass machine are exposed at the host machine level.
Accessing the VM from the host machine’s network
4.2 Accessing the VM from the local network
With local network we mean the network to which the host machine is connected (in my case, all machines carrying an IP in the 192.168.4.0/24 range).
Baculum ports are not exposed to the outside net
We therefore fire up a browser on a machine inside that subnet and first try to
- … directly contact the IP of the VM on ports 9095 and 9096
- … contact the host machine on ports 9095 and 9096
In each of these cases, we get an “Unable to connect” from our browser. Unsurprisingly, the host machine does not allow any outside communication on those ports. We therefore have to instruct the host machine to allow traffic into the local network on those ports.
There is an excellent walk-through by Mauro Werder on bitbucket.io which explains how expose mulitpass VM services through the IP address of the host:
Installing and enabling ufw on the host
Port forwarding under linux is governed by the much haunted iptables and – more recently – by ufw, which is just some kind of less complicated adminstration frontend for iptables.
On the host machine (in my case q556) make sure that iptables and ufw are installed and enabled:
|
1 2 3 4 5 6 7 8 9 10 11 12 |
ilek@q556:~$ sudo apt update ilek@q556:~$ sudo apt upgrade ilek@q556:~$ sudo apt install ufw ilek@q556:~$ sudo ufw allow 9095 Rules updated Rules updated (v6) ilek@q556:~$ sudo ufw allow 9096 Rules updated Rules updated (v6) ilek@q556:~$ yes | sudo ufw enable Command may disrupt existing ssh connections. Proceed with operation (y|n)? Firewall is active and enabled on system startup |
Port forwarding between local network and VM
One might expect that opening the ports on the host machine with the above ufw commands is enough to allow accessing the Baculum services from the local network. This is not true, though. Until now, we have only told the host to allow network traffic on ports 9095 and 9096. The host is still unaware though what to do with this traffic and tries to redirect it to its localhost interface where there is no server to respond to any enquiry on that port.
When we try again to open http://q556:9096 with a browser from a client in the local subnet, we will still get the same “Unable to connect” message.
We therefore have to instruct the host machine explicitly that any traffic on these ports should be redirected to the IP of the multipass VM.
(Temporarily) redirect traffic to the VM
First we need to allow IPv4 forwarding on the host in general. Edit /etc/sysctl.conf and uncomment (or edit) the following line:
|
1 |
net.ipv4.ip_forward=1 |
Reload the new settings and check that IPv4 forwarding is enabled:
|
1 2 3 4 5 |
ilek@q556:~$ sudo sysctl -p [sudo] password for ilek: net.ipv4.ip_forward = 1 ilek@q556:~$ cat /proc/sys/net/ipv4/ip_forward 1 |
Now comes the main redirection instruction, we will start with redirection instructions for port 9095 (Baculum Web):
|
1 2 |
ilek@q556:~$ sudo iptables -t nat -I PREROUTING 1 -i enp1s0 -p tcp --dport 9095 -j DNAT --to-destination 10.27.44.252:9095 ilek@q556:~$ sudo iptables -I FORWARD 1 -p tcp -d 10.27.44.252 --dport 9095 -j ACCEPT |
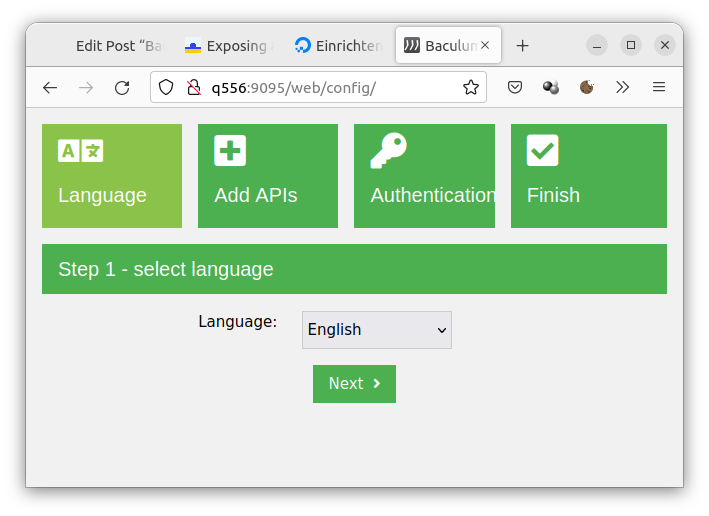
When we now test our access to Baculum web from a browser on a machine inside the local subnet, we are asked to authenticate (enter admin for both user and password) and then get the following page:
We repeat the iptables command for the Baculum API port 9096:
|
1 2 |
ilek@q556:~$ sudo iptables -t nat -I PREROUTING 1 -i enp1s0 -p tcp --dport 9096 -j DNAT --to-destination 10.27.44.252:9096 ilek@q556:~$ sudo iptables -I FORWARD 1 -p tcp -d 10.27.44.252 --dport 9096 -j ACCEPT |
Again, we can check with a browser on an outside machine connected to the local subnet to open http://q556:9096. Again we should land on the same page as shown above – albeit through a different port this time.
To demonstrate that these forwarding commands have no permanent effect, we will reboot the host machine. When we try to connect to Baculum Web or Baculum API through an outside browser, we will again get an “Unable to connect” message again. The iptables instructions are gone after the reboot and we have to issue them again in order to reforward traffic on ports 9095 and 9096.
In the next section, we will show how to make these changes permanent.
Making port forwarding instructions permanent
As the instructions for perpetuating the changes to iptables in the Mauro Werder blog did not work for me, I will go for an alternative way that was presented by Vivek Gite on cyberbiz.it.
We first issue the temporary iptables commands from the previous section on the host machine again so that the the port forwardings get activated on a preliminary basis as before:
|
1 2 3 4 |
ilek@q556:~$ sudo iptables -t nat -I PREROUTING 1 -i enp1s0 -p tcp --dport 9095 -j DNAT --to-destination 10.27.44.252:9095 ilek@q556:~$ sudo iptables -I FORWARD 1 -p tcp -d 10.27.44.252 --dport 9095 -j ACCEPT ilek@q556:~$ sudo iptables -t nat -I PREROUTING 1 -i enp1s0 -p tcp --dport 9096 -j DNAT --to-destination 10.27.44.252:9096 ilek@q556:~$ sudo iptables -I FORWARD 1 -p tcp -d 10.27.44.252 --dport 9096 -j ACCEPT |
We then install the iptables-persistent package on the host machine:
|
1 |
lek@q556:~$ sudo apt install iptables-persistent |
During the install you will be asked two questions to which you both answer Yes. These questions relate to saving the current set of IPv4 / IPv6 rules into a rules.v4 and rules.v6 under /etc/iptables.
Here’s a YouTube explanation video how iptables-persistent works. To summarize:
iptables-persistentextends theiptables-saveandiptables-restorecommands.iptables-savereads the complete set of rules currently in place and dumps it to the console. So the word ‘save’ is a bit misleading. In order to really save you have to add the redirect operator>along with a path where the system should write the current rule set. When you answered Yes while installingiptables-persistent, you actually agreed to runningiptables-save > /etc/iptables/rules.v4.iptables-restoreworks the other way round: It reads a set ofiptablesrules from a file and replaces the currentiptablesconfiguration with those rules. Therefore the syntax is – equivalently –iptables-restore < /etc/iptables/rules.v4- As long as
iptables-persistentis installed and engaged,iptables-restore < /etc/iptables/rules.v4will be executed each time the machine boots.
We finally reboot the host machine and check if our Baculum ressources are directly accessible from another client browser inside the local subnet.