If you want do serious programming, you sooner or later need to work with a version control system such as Subversion, Mercrurial or – probably the best choice – git. As far as git is concerned, you have got 3 choiches: (1) run the version control system locally, (2) use some public service like github and (3) set up a server of your own. This post explains how to realize option (3) on an OpenWRT router.
Reconciling OpenWRT’s single-user setup with git
Although there are ways to create additional users, OpenWRT is basically intended to be a single user system, i.e. there is root and that’s it. On the other hand, git relies on the operating system to set the correct access rights to the repositories, so oWRT’s single user philosophy is hard to reconcile with git’s requirements regarding acces rights. The good news is, there are basically 2 ways to overcome this contradiction:
git over http
My first idea was share git’s services with the outside world over http(s), which is said to be possible with more recent versions of git. There are 2 major advantages, if one could set up such a structure.
- If git services are transported by the http protocol, the access permissions can be set at the web server level and there is no need to create users on the OpenWRT system. The single-user obstacle would therefore be eliminated.
- There is no danger that users behind a corporate firewall or similar cannot connect to the git server, as port 80 is always open.
Unfortunately, all my attempts to set up a git server with lighttpd failed and I was unable to figure out the underlying problem – most probably it failed because I had either a wrong file permissioning on the working directory or a flawed configuration of the server, or maybe both. That said, the disadvantage of providing git access over http is that the web server’s configuration file quickly becomes too overloaded.
git over ssh
The alternative is to connect to git the traditional way, which is over ssh protocol. Unfortunately, there is little granularity as far as permissioning is concerned – and with OpenWRT’s single-user philosophy, things get even worse. This is where gitolite comes into the game. There is even a how to on the OpenWRT website on how to set up gitolite, although it is a bit outdated. But with a few additional tweaks, you get a git service which runs really smooth.
Installation prerequisites
extroot and dedicated partition
This post assumes that you are running your OpenWRT device with a pivot-overlay. As repositories are usually hungry for disk storage and embedded devices only have limited capacity, it makes sense to add some USB-storage.
Additionally, it makes sense to have the storage in a dedicated partition in order to separate it from the storage of the remaining operating system (afaik, there is no way to set user quotas in git/gitolite). I set apart a 2 GB partition, which I formatted as ext4.
As gitolite is completely installed in the /root directory on the oWRT device, your fstab entry should look like this (assuming that the 2GB partition you set apart for git is the 2nd partition on the external storage device):
|
1 2 3 4 5 6 7 |
config 'mount' option target '/root' option device '/dev/sda2' option fstype 'ext4' option options 'rw,sync' option enabled '1' option enabled_fsck '1' |
Perl Language
As gitolite is written in Perl, you need to install a perl base system and a couple of modules. This is one point, where the instructions on the OpenWRT site look a bit outdated, as they ask you to install modules such as perlbase-hostname although these modules are officially deprecated in Perl and no longer offered as an OpenWRT package.
Below is a list of the current Perl modules needed to run gitolite. Install those by opkg install or – better still – directly activating them in the make menuconfig prior to compiling your oWRT system binaries.
|
1 2 3 4 5 6 7 8 9 10 11 12 13 14 15 16 17 18 19 20 |
perl - 5.20.0-6 perlbase-base - 5.20.0-6 perlbase-bytes - 5.20.0-6 perlbase-config - 5.20.0-6 perlbase-cwd - 5.20.0-6 perlbase-data - 5.20.0-6 perlbase-errno - 5.20.0-6 perlbase-essential - 5.20.0-6 perlbase-fcntl - 5.20.0-6 perlbase-file - 5.20.0-6 perlbase-findbin - 5.20.0-6 perlbase-getopt - 5.20.0-6 perlbase-io - 5.20.0-6 perlbase-list - 5.20.0-6 perlbase-scalar - 5.20.0-6 perlbase-selectsaver - 5.20.0-6 perlbase-symbol - 5.20.0-6 perlbase-sys - 5.20.0-6 perlbase-tie - 5.20.0-6 perlbase-xsloader - 5.20.0-6 |
The opkg installation command is as follows:
|
1 |
opkg install perl perlbase-base perlbase-bytes perlbase-config perlbase-cwd perlbase-data perlbase-errno perlbase-essential perlbase-fcntl perlbase-file perlbase-findbin perlbase-getopt perlbase-io perlbase-list perlbase-scalar perlbase-selectsaver perlbase-symbol perlbase-sys perlbase-tie perlbase-xsloader |
git Preparations
Before installing gitolite, git must be installed on your system. Install it by issuing opkg install git or – better still – by directly selecting the git package when doing make menuconfig prior to your installation.
Apart from that – and that is one point missing in the OpenWRT docs on how to install gitolite – gitolite expects to retrieve the git user name and email address of the git admin on the router. If these attributes are not set, gitolite will issue a warning in the installation. So it is better to configure git before the gitolite installation:
|
1 2 |
root@OpenWRT: git config --global user.name "Git Admin" root@OpenWRT: git config --global user.email account@mailprovider.com |
Your ssh key for gitolite access
Although this step is only thinly documented in the oWRT howto, it is one of the most crucial steps which took quite a while for me to figure out. Basically, you need a public ssh key which will then be appended to the /etc/dropbear/authorized_keys file on your oWRT machine. It is on the basis of that key that an external git user will be granted access to the machine. The problem with using such an ssh key is twofold:
- On the OpenWRT server, you do not want git users to get root access to your machine – but this would be exactly what would happen if the key was simply added to the
authorized_keysfile. gitolite solves that problem by adding a special preamble to the key which forces the user to a special gitolite-shell with restricted access. - Given the fact that users presenting the gitolite key are forced into a restricted environment on the OpenWRT machine, it is impossible to use an existing key which already grants unrestricted ssh root access as a key for git(olite) access at the same time. While this should not be any problem for external users whose keys are not already in the OpenWRT
authorized_keysfile, the oWRT server admin – who normally also wants gitolite access for adminstering the git server – cannot use his existing ssh key for gitolite.
In case you are both adminstrator and (future) git user
In case you are both the adminsitrator of the oWRT machine (who already has put his key in the /etc/dropbear/authorized_keys file on the oWRT server) and a git user, generate another key with ssh-keygen and make sure it has a name other than id_rsa when prompted where to save the key. Do not use the default setting or you risk that your existing key pair is overwritten and you lose access to any server which you access by your ssh key (for instance your oWRT machine).
|
1 2 3 4 5 6 7 8 |
ilek@i7:~$ ssh-keygen -t rsa -b 2048 -C "gitadmin@clientMachine" Generating public/private rsa key pair. ##### THINK TWICE B E F O R E YOU HIT ENTER AT THE FOLLOWING PROMPT ##### Enter file in which to save the key (/home/ilek/.ssh/id_rsa): /home/ilek/.ssh/id_rsa_git Enter passphrase (empty for no passphrase): Enter same passphrase again: Your identification has been saved in /home/ilek/.ssh/id_rsa_git. Your public key has been saved in /home/ilek/.ssh/id_rsa_git.pub. |
Now that you have a second pair of ssh keys which will later serve as your git key, you must find a way to tell ssh when to use which key. The easiest way to do that is by creating a config file. If you have your standard key pair id_rsa (which I will refer to as the “default” key and id_rsa_git (which I will refer to as the “git” key), just put a config file in your ~/.ssh directory which looks like this:
|
1 2 3 4 5 6 7 8 9 10 11 |
Host git user root hostname <IP or URI of OpenWRT Machine> port 22 identityfile ~/.ssh/id_rsa_git.pub Host main user root hostname <IP or URI of OpenWRT Machine> port 22 identityfile ~/.ssh/id_rsa.pub |
Note that both users log in as root. Gitolite’s trick is to identify the user by the id_rsa_git.pub key supplied and then tunnel the user into a restricted git shell with a virtual git identity.
If you later want to access a git repo on the server, you can access it by simply typing:
|
1 |
ilek@i7:~$ git clone root@git:reponame |
git will pass the login to ssh which will then revert to its config file, see that root@git matches the Host git entry and automatically select the id_rsa_git key pair.
For later purposes in the setup process, scp the id_rsa_git.pub key from your client’s ~/.ssh directory to the /root directory of your OpenWRT machine.
In case you are only a (future) git User and not ADMIN of the oWRT device
If you are not an administrator of the oWRT device hosting the git server, you can simply use your default ssh key to be identified as a git user. As the authorized_keys file on the oWRT machine does not contain this key, there won’t be any collision. Just send your ~/.id_rsa.pub key to the oWRT/git admin who will then add it to gitolite.
Installing gitolite on the OpenWRT server
Once you have completed the preliminary steps, installing gitolite is quite easy.
Preliminary work
Log into the oWRT device as root and cd to the /root directory and rename the public key file you scp’ed from the client machine to gitadmin.pub (or whatever else you would like to be the login name for the git administrator).
Core installation
Then issue the following commands:
|
1 2 3 4 5 6 |
cp -p /etc/dropbear/authorized_keys /etc/dropbear/authorized_keys_backup git clone git://github.com/sitaramc/gitolite mkdir -p /root/.gitolite/logs gitolite/install -ln /usr/bin gitolite setup -pk gitadmin.pub rm gitadmin.pub |
Post Install Tweaks
There are two things which still need to be tweaked:
The first one is that gitolite stores the authorized_keys file under /root/.ssh, but oWRT’s dropbear expects the file to be in /etc/dropbear. As shown in the oWRT documentation, this can be solved by creating a symlink:
|
1 2 |
rm /etc/dropbear/authorized_keys ln -s /root/.ssh/authorized_keys /etc/dropbear/authorized_keys |
Do not forget to copy back the content of the /etc/dropbear/authorized_keys_backup to the authorized_keys file (you can vim-edit the file both from /etc/dropbear and from /root/.ssh). Once again: Do not forget this step or you risk shutting yourself out from your oWRT box.
The second problem is something I stumbled accross here. Apparently gitolite tends to “recreate” its own version of the authorized_keys file with each git push. That is exactly what we do not want as this will delete any root user keys we just restored from authorized_keys_backup. The solution is as follows:
|
1 2 |
cd /root mkdir -p local/triggers |
Then create a script file with the following content:
|
1 2 |
#!/bin/ash ln -sf ~/.ssh/authorized_keys /etc/dropbear |
Make the file executable:
|
1 |
chmod +x local/triggers/link-akf |
Edit .gitolite.rc as follows:
- Uncomment the line
LOCAL_CODE => "$ENV{HOME}/local", - Immediately below that line add a line with the following content:
NON_CORE => 'ssh-authkeys POST_COMPILE link-akf',
Testing and configuring
Check the authorized_keys file
If everything worked correctly, your /etc/dropbear/authorized_keys file should contain your standard ssh keys and a section which looks as follows:
|
1 2 3 |
# gitolite start command="/root/gitolite/src/gitolite-shell gitadmin",no-port-forwarding,no-X11-forwarding,no-agent-forwarding,no-pty ssh-rsa AAAAB3Nza ... and the remainder of the public key # gitolite end |
Check if you can clone a repo from the server to the client machine
During the setup, gitolite has created two repositories: gitolite-admin and testing. The testing repo is read/write for any registered gitolite user while the gitolite-admin repo can only be accessed by the gitadmin user we specified during the setup. You should now be able to clone the gitolite-admin repo from your client machine:
|
1 2 3 4 5 6 7 8 |
ilek@i7:/media/ramdisk$ git clone root@git:gitolite-admin Cloning into 'gitolite-admin'... remote: Counting objects: 21, done. remote: Compressing objects: 100% (19/19), done. Receiving objects: 100% (21/21), 3.12 KiB | 0 bytes/s, done.21/21) Resolving deltas: 100% (3/3), done. 0 (delta 0) Checking connectivity... done. |
Adding a user and setting permissions
If you want to add another user, you just take the new user’s public ssh key, rename it to <username>.pub and copy it to the gitolite-admin/keydir. Then run the following conventional git commands:
|
1 2 3 |
git add <username>.pub git commit -m "User <username> added" git push origin master |
In order to conduct the next test, you should add another user from another machine who will not be admin (neither for oWRT, nor by gitolite; we just want a plain and simple git user who has access to the testing repo). Access rights to the repositories can be granted or withdrawn by editing the gitolite-admin/conf/gitolite.conf file (which is pretty self-explanatory).
Check if git users are really ring-fenced from root access
Finally you should check if git users who log in through the root ssh access are not able to get access to the root shell – after all you want to be sure that git users cannot execute root commands on your server. With the gitolite account just created, try the following:
|
1 |
ssh root@<oWRT-IP> |
If everything is fine, you should see a message like this:
|
1 2 3 4 5 6 |
PTY allocation request failed for channel 0 sh: hello, <username>, this is root@ running gitolite3 v3.6.3-11-g247156 on git 2.0.0 hostname: not found R W testing Connection to <oWRT-IP> closed |
If you see your normal oWRT welcome screen after the login, then something has gone awfully wrong and gitolite users can access the root functionalities of your OpenWRT operating system. In that case you should delete the complete gitolite installation from your server and restore the authorized_keys file from the backup file you made.
|
1 2 3 4 5 |
cd /root rm -rf .gitolite gitolite rm .gitconfig cd /etc/dropbear cp authorized_keys_backup authorized_keys |
Using git(olite) with Eclipse
Once you have a repo on gitolite, it is convenient to directly connect it to a programming IDE like Eclipse. On your local machine, proceed as follows:
Setting up Eclipse for gitolite
Click Window / Preferences and navigate to Network Connections / SSH2: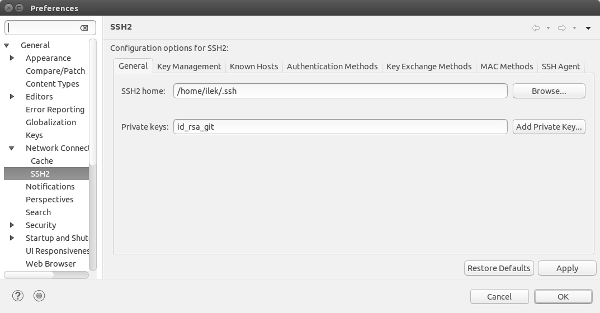
Enter the ssh home directory (which is usually under ~/.ssh for Linux machines) and the private key name. If you are on a machine with both root and git access make sure, that it is the git key and not the default key.
Then click the Key Management tab, press the Load Existing Key and navigate to the public key which corresponds to the private key you specified in the previous tab.
Importing a repository from gitolite into Eclipse
Once you have estabished the connection, you can easily import a project from your gitolite server. We are going to import the (empty) testing repository as a Java project and add one file.
- Choose
File/Importfrom Eclipse’s menu, - choose
Git/Projectsfrom Git in the following dialog and clickNext, - choose
Clone URIand clickNextagain.
In the dialog that opens now,
- fill in the Host field with the IP Address of your Git Server (or the FQDN),
- the Repository Path with the name of the repository you want to clone (
testingin our case), - Set the Protocol to ssh,
- and enter the User name – which in case of our OpenWRT installation should be
root(remeber that gitolite always clears through a central user and uses the ssh key to map the central user to the actual gitolite user) - the URI field is filled automatically, the Port and Password fields remain empty
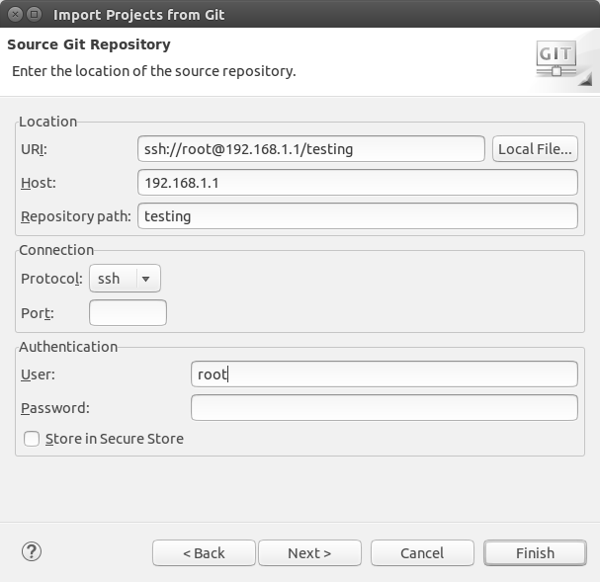
After clicking Finish you will come to a dialog in which Eclipse warns you that you import an empty repository – nothing to worry about as gitolite has set up the testing repository without any content.
The New Project Wizard will then take over. Choose Java for this example, give a meaningful project name and hit Finish again.
Once you have finished that procedure, Eclipse will have cloned a local copy of your git repository to your client. You can work on that copy as before.